Remove Fuel Pump on a 2005 Mazda RX8
Difficulty: Medium
Warning: Fuel is a hazardous chemical, take appropriate precautions
Recommended Tools: Screwdrivers, special tool for ring removal
Since the strange power loss issue I was experiencing on the RX-8 had a lot of similarities with an issue I had early on with the Fiero, I wanted to check that the fuel pump filter wasn’t clogged. The fuel filter sock is buried inside the bottom of the plastic fuel pump housing that needs to be removed …
Pump removal procedure
- Start the car and get it up to operating temperature
- Park the car with the front wheels on magazines so that you can re-calibrate the DSC without scrubbing the tires when you connect the battery (requires turning the steering wheel lock to lock)
- Leave car running and remove the fuel pump fuse (#20?) to deactivate the fuel pump and thus de-pressurize the fuel system
- Disconnect the battery
- Remove rear seat on driver’s side – there are plugs in the corners of the seat that simply require a good solid yank upwards to release
- Remove fuel pump cover plate (4 screws)
- Disconnect the wiring harness
- Disconnect the fuel line – IMPORTANT be prepared for some fuel spillage out of the line. Speaking from experience here, there is a high risk of damage if you do not disconnect the fuel line before trying to remove the plastic ring. It is quite tough to remove the connector, there must be a special tool for it but if you don’t have one like me, there are two dimples near the ends of the plastic ring that need to be carefully pried up enough to clear the ridge on the inner tube. They need to be pried up quite far and it felt to me like the ring was about to break at any moment.
- Remove the plastic ring on the housing – there are a few small tabs pressing against the teeth on the OD of the ring that need to be disengaged to allow the ring to spin. Look all round the diameter and locate these tabs and ensure they are disengaged. I started with a large flat screwdriver and a rubber mallet, carefully tapping on different ribs and trying to rotate the ring to no avail. When the careful taps progressed enough to snap a couple of ribs, I decided to make a special tool. This consisted of two pieces of flat metal bar bent at right angles with holes in one piece and slots in the other to facilitate some adjustment on the distance between the legs. I also drilled a hole in the centre and filed it to 1/2″ square to take a socket drive. The legs were bent very slightly to try and ensure that they lined up evenly on the ribs but not enough to press the ring in against the housing.
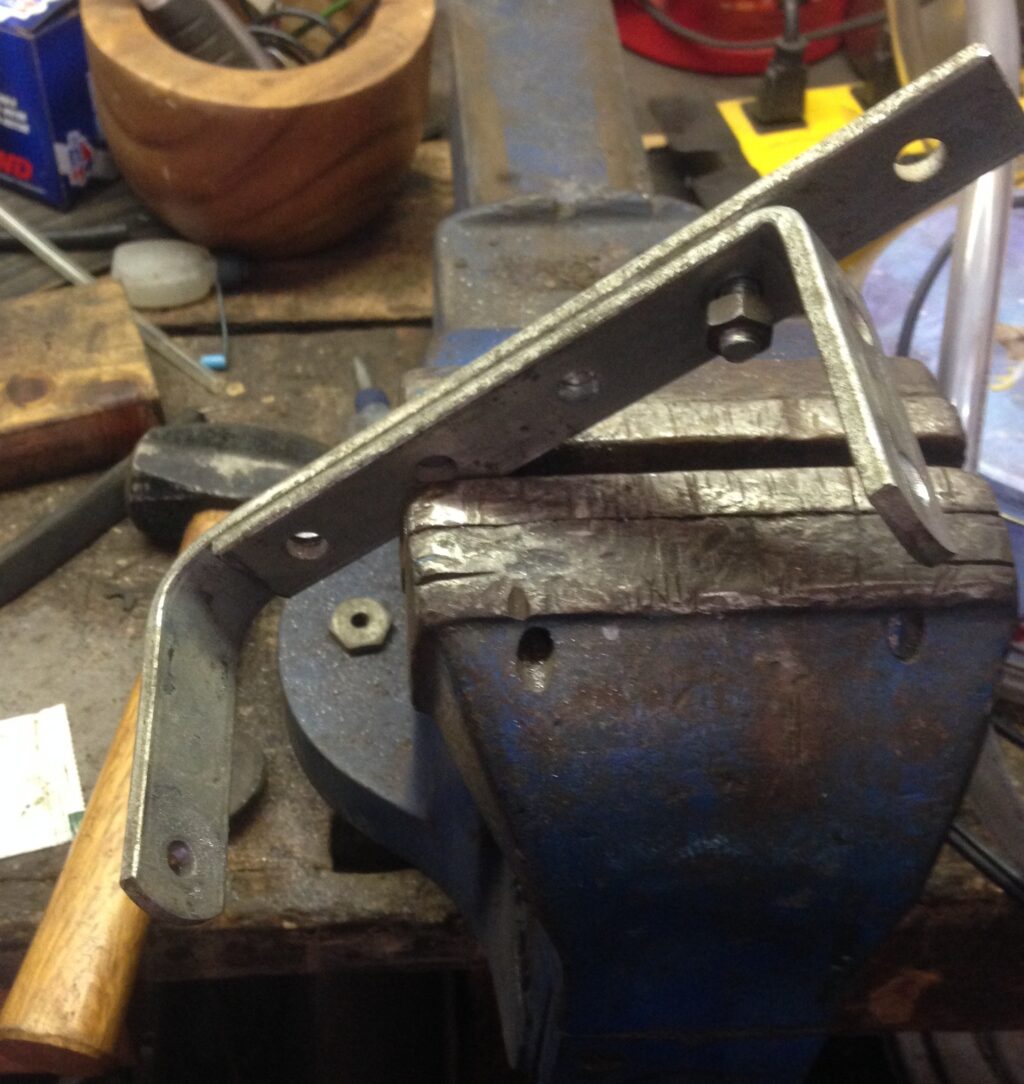


It took a few hours to get the tool made and it had a nice snug fit on the ring, then with the big breaker bar, it turned maybe 3° before breaking the ribs. Thinking about it now, you should take care here to ensure that the legs of the tool are not pressing inwards on the ring causing an increase in friction. This might have been contributing to why the ring on my pump was so determined not to move, even with my wonderful tool. Nearly all the remaining ribs on my ring were broken off before the hammer and chisel came out and finished the job!
- Disconnect second electrical connection underneath for the fuel level sender

- Disconnect second fuel line further down in the housing for the fuel return, this also has one of the plastic clips that needs to be prized open to get the line off, just like the one on the outlet on top of the housing, but a bit smaller.

- Remove fuel pump assembly carefully and remember that there will be a tad of fuel still in the housing so get a tray
Now you’re ready to replace the fuel pump or whatever you need to do.
Replacing the Fuel Pump
- First thing to do is to un-hook the slides from the lower section by carefully levering them over the stops, one at a time, don’t lose the spring!
- Next you can unplug the little wiring harness leaving only the plastic hose connecting the two pieces.
- I carefully pried on the plastic hose at the end with the clamp that is attached to the top and worked it until it came off.

- Now the top is off, I applied the same process to get the hose off the fuel pump, again being careful not to damage the hose.
- The next bit was pretty tough, the bottom piece has an insert that needs to come out to get to the pump. There are two tabs on either side near the sliders, these need to be depressed to clear the lips. Then carefully work each side up slowly, making sure you don’t cock the insert over too far as this will prevent the insert from moving.
- To be continued …
Sadly I am not likely to get back to this now unless someone specifically asks for this info. I have sold the RX-8 and still have a pump housing somewhere but will be focusing on the other projects for a while.
